
Grow Your Own Garlic: The Multifaceted Culinary Delight!
Ah, garlic.
When I think of garlic, I think fall. Cozy sweaters, warm and comforting food, quiet days, and lots of cooking. And because I live in the Pacific Northwest, I also think of planting! But garlic isn’t just about fall, nor is it limited to planting here in the PNW. On the contrary, garlic is one of the most versatile foods and crops out there.
If you can’t tell already, I am an avid garlic lover. Garlic is a superfood! It can be used in nearly any dish one can think of. Well, almost. Do avoid putting garlic in your cookies or cakes unless you really want to experiment. Not only is garlic versatile, it also has some amazing health benefits. It is an excellent immune booster and great for cardiovascular health. Need I mention its innate ability to ward off vampires?!
Now, let’s get to the good stuff.
When to Plant
As mentioned before, garlic in the Pacific Northwest is primarily planted in the fall, anytime from mid-September through October. This timeline translates to much of the United States, even warmer climates in the south. It can be planted in early spring. If done so, however, it generally will not develop as substantial of bulbs as those planted in the fall.
Warning:
Garlic is a long season crop – say you plant in early October, you will not harvest the crop until June or July of the next year. Garlic likes to take its time, but it is all worthwhile in the end. Trust me!
Before Planting
Decide where you will plant. Another great thing about garlic’s versatility is that it does not need a ton of space. It can be grown in containers, raised beds, or in the ground. It can be done in as small or large of a space as you desire. The most important factors are that you plant in a sunny spot and in rich, loose, well-draining soil. If you do plant in containers or a raised bed, be aware that the soil depth should be at least 8 inches for quality root development.
As for me, I plant my garlic in a 4 foot by 10 foot raised bed, with a 2-foot depth. This provides me with approximately 90 mature bulbs weighing a total of 7 pounds each year. This harvest usually lasts me until the following summer depending on how I process it all. More on that later.

As you plan your area, try thinking ahead to what you might be planting in the spring, or if you have a fall garden, look around at what crops you have planted. Garlic, which is in the Allium family, is a great companion to the Brassica family, such as kale, Brussels sprouts, broccoli, cabbage, and more. Alliums create a stench, if you will, that deters pests such as aphids, from attacking the brassicas. This is a component of companion planting – a very fun concept to think of when planning a garden, but much too in depth to get into here. Another tip is to not plant the garlic in proximity of legumes – peas and beans. Garlic can stunt the legume plants’ growth. These tips are just that – tips. In small gardens, there isn’t much room for versatility and that’s okay!
Preparing the soil for your planting is simple – add a few inches of organic compost and a light sprinkling of TSC’s Complete Fertilizer mix before planting. The reason we go light on the fertilizer at this stage is because much of the nutrients will not be attainable by the roots during the cold, winter months. And for those of us in the PNW, many of the nutrients will be leeched out from our excessive rainfall during the winter months. We’ll add more fertilizer in the spring, which I will discuss later on.
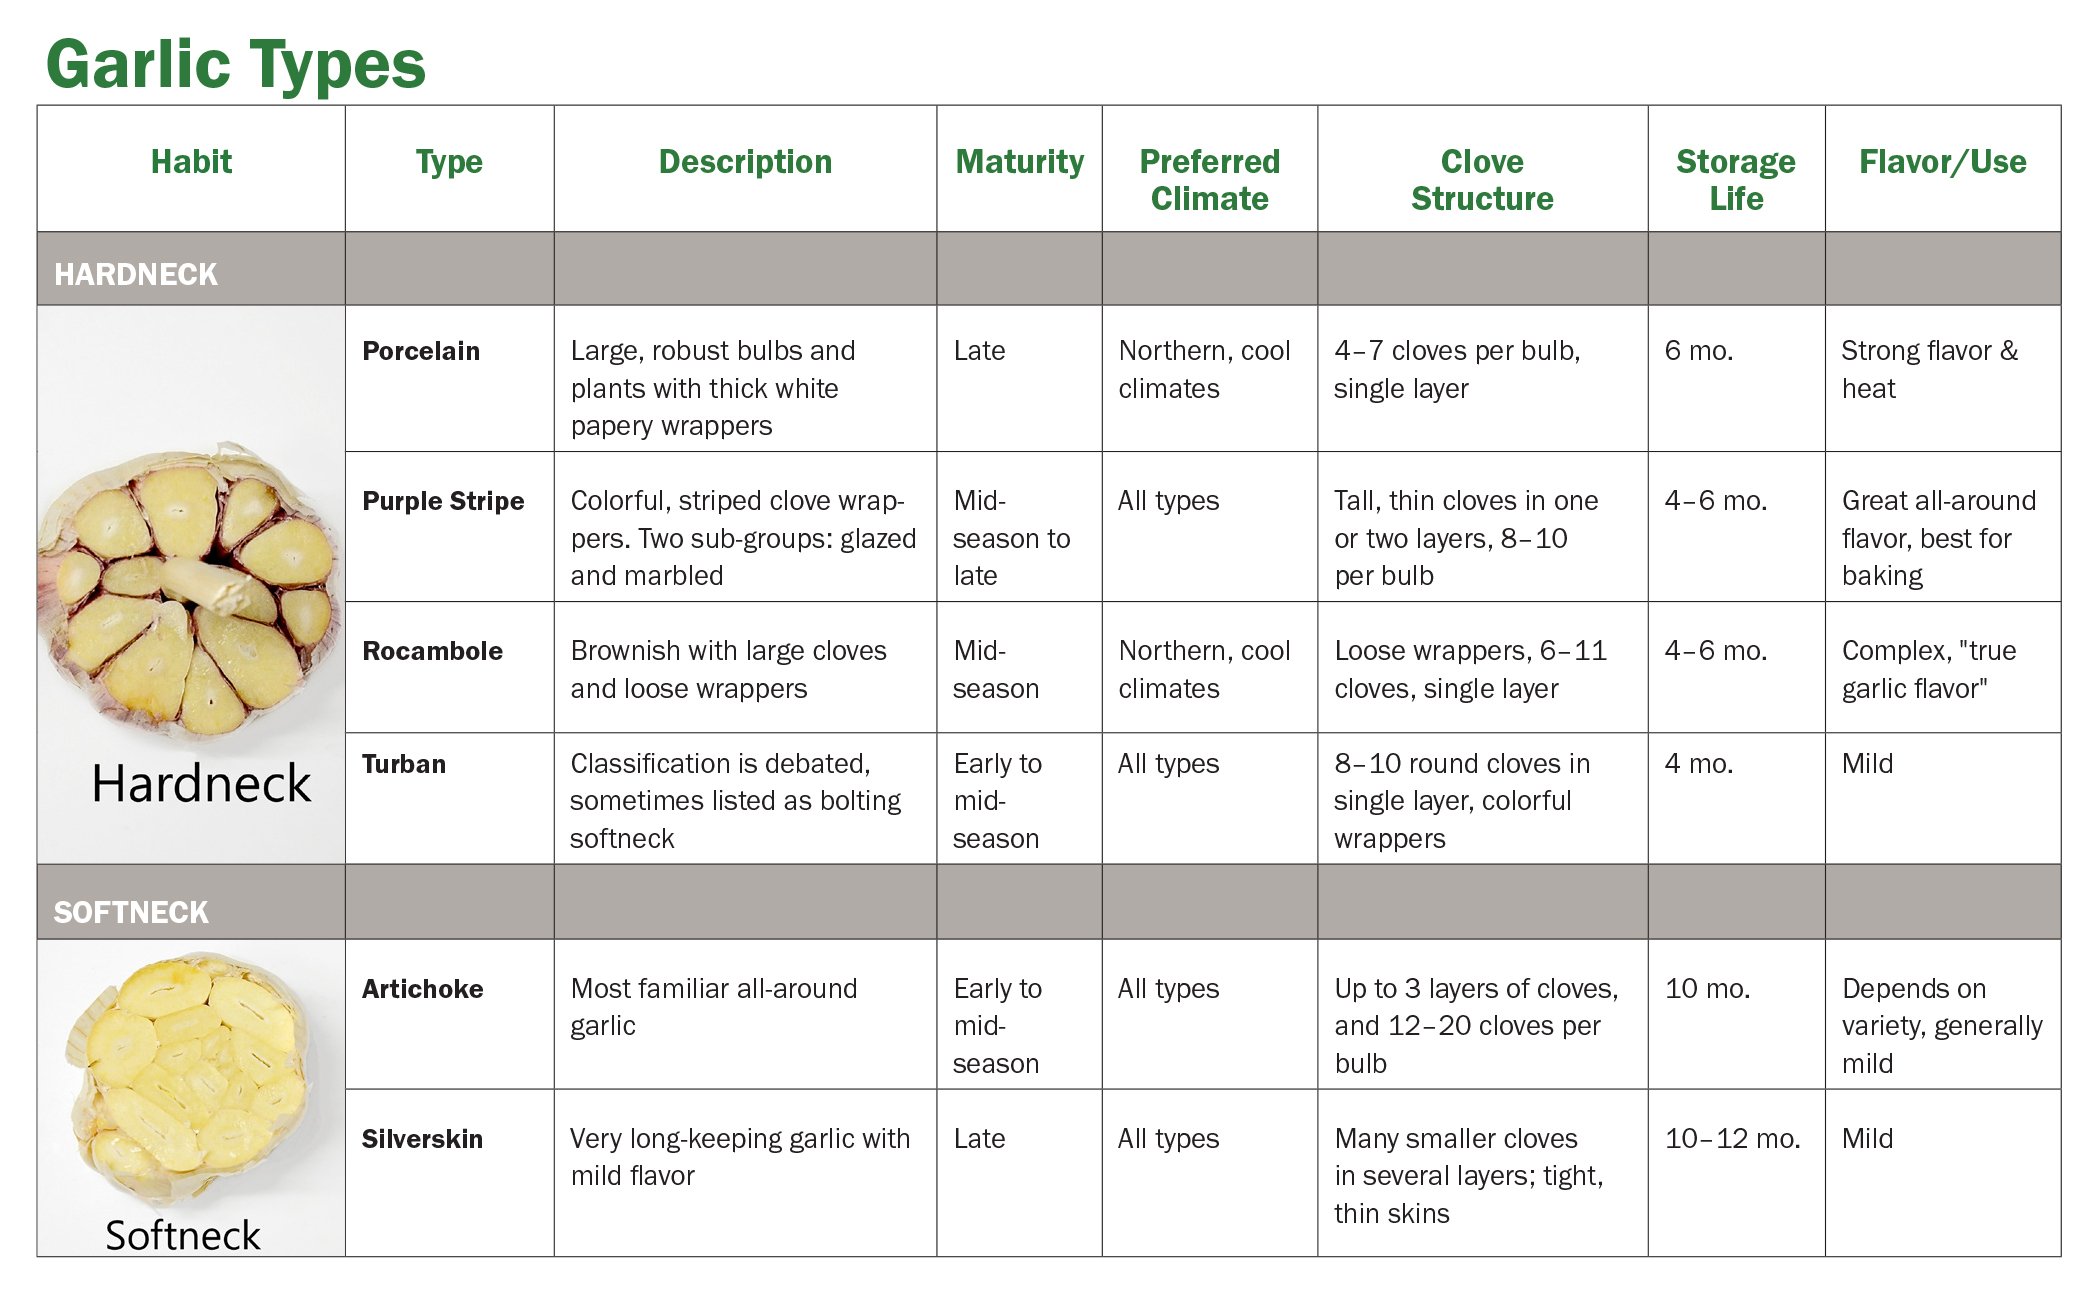
The other component before planting is to decide on varieties. This is by my favorite part. There are two major categories of garlic – hardneck and softneck.
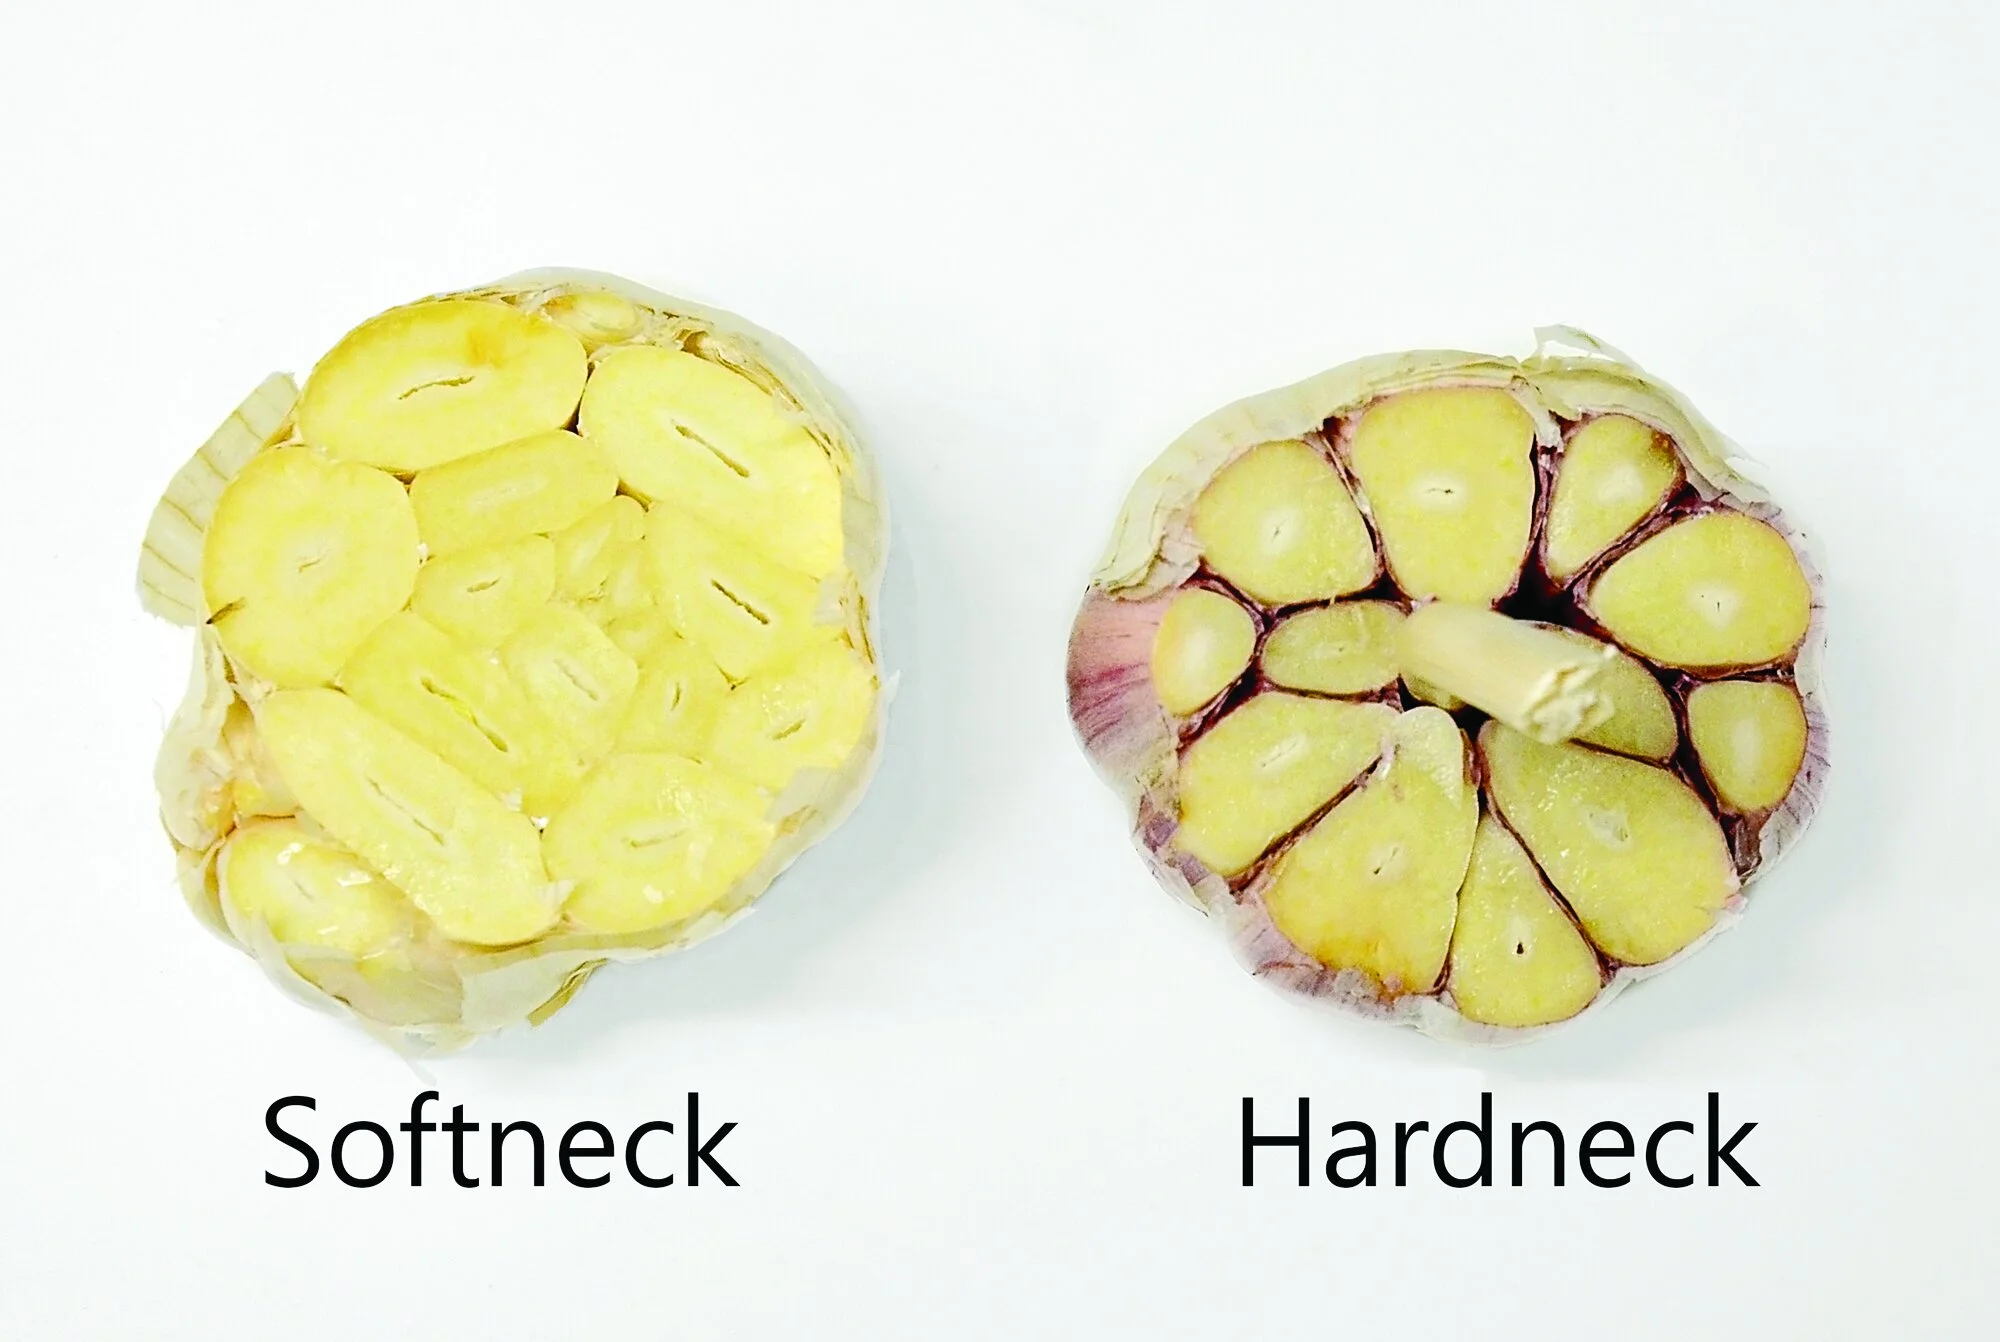
Generally, softneck varieties are what you see in the grocery store. When broken apart, the bulbs have a row of larger cloves encircling row after row of smaller cloves. Most of us are familiar with these because the smaller they get, the more frustrating they are to peel, but softnecks deserve their time in the spotlight. They generally have a longer shelf life. Have you ever seen pictures of the beautifully braided strands of garlic? That is done with softneck varieties!
Hardnecks, on the other hand, have a hard stem in the center of the bulb. This is the defining difference between the two families. Because of the hard central stem, hardneck varieties do not have the very tiny cloves in the middle, but rather have rows of larger and (generally) easier to peel cloves. Hardnecks do not always keep as long as softneck varieties, but they do tend to have stronger flavor profiles. Yum!
Another factor of hardneck varieties is their ability to grow scapes. These are edible ‘flower’ stems that produce in the spring. Scapes should be harvested in order to send the energy back into the formation of the bulbs. Harvesting the scapes as they appear allows for a delectable, garlicky treat when the full harvest is still months ahead. There are a few ways to harvest these when seen – you can simply snap the scape off the plant or snip with trusty clippers. Scapes are highly sought after and can be cooked in a variety of ways. My favorites are to sauté them or turn them into scape pesto.

In my garden, I grow mostly hardneck varieties, which I will usually process. I save about a quarter of my raised bed to plant softneck varieties. These will be for my long-term storage. Within each category of garlic, there are many wonderful varieties to plant. Some may do better in your climate than others or be more appealing to your palate.
There is also a variety called Elephant garlic. Though this is not a true garlic, it is still in the allium family and can be treated very similar. It produces very large bulbs and are very mild in flavor, somewhat reminiscent of sweet onion. You will see this available at the same time as traditional garlic.
Planting
Once you have prepped the area and decided on your varieties, you can start planting! When you have your bulbs and labels gathered, it is time to separate the cloves. Try and do this WITHOUT removing the paper. The paper protects the garlic cloves from rotting or any diseases that may be present in the soil, but naked cloves should sprout just fine.

Next is to get them planted! Plant each clove around 1-2 inches deep and about 6-8 inches apart. They do need that space in between them to produce healthy, robust cloves. A good mulching over the garlic is an excellent idea. To be honest, I do not do this every year as life gets busy. However, a good layer of straw over the planted area will retain moisture and keep the cloves warm over the winter.
And that’s it! Well, for a few months.
Your garlic might sprout before winter hits. This is one of my favorite parts. Little blades of green fill up my bed while everything else is dormant. Don’t panic though if yours don’t sprout. They often won’t until the soil warms back up in the spring.
When the soil does start to warm up is when it’s time to bring your attention back to the garlic. As I mentioned earlier, garlic, and alliums in general, love their nitrogen, and that’s exactly the type of fertilizer you’ll want to feed them throughout the spring months. I prefer to feed mine with a liquid fertilizer such as Neptune’s Harvest Fish & Seaweed or Age Old Grow. Do this a few times during the growing season, about every couple weeks. It’s also important to keep them well watered during this time. Here in the PNW, we rarely have to worry about putting a hose to the area as our rainfall often extends through much of spring. However, it’s important to be attentive to the weather and water the area when the rains are not persistent. I heard somewhere once that the bulb in the ground is only as healthy as the stalk above ground. Simple but life changing. Keep that in the back of your mind.
This is also the season when you’ll start seeing the scapes appear on your hardneck varieties. Don’t forget to pluck ‘em and eat ‘em!
It’s time we get to the less enjoyable part: Pests and Diseases
Garlic does not have many issues in this arena, but the natural world is diverse, so there are some things to watch out for.
Thrips and nematodes are their main pests. Thrips cannot be seen by the naked eye, but their damage is easy to spot. Tiny little clusters of dots are their tell-tale sign and can be controlled with Pyrethrin if the problem is bad enough. Bulb nematodes dwell in the soil and may hurt the formation of the bulbs. These are also microscopic but can easily be deterred by crop rotation. This principle is key to restricting the presence of many pests and diseases throughout the garden. For garlic, it’s ideal for a 5–7-year crop rotation, meaning try to plant in a different area for at least 5 years before coming round to a familiar spot. Understandably, this is tough especially in a small yard. Another tip is to simply create and maintain a diverse ecosystem.
The diseases prone to garlic are also easily remedied by these solutions. Rust and Botrytis are their most damaging threats and are more prevalent in humid and foggy areas. Crop rotation and sufficient drainage will deter this.
Okay, back to the fun stuff.
Harvest
As harvest approaches, say in late April or May, start restricting water to the area. One, this prevents mold. Two, this encourages the bulbs to form as it’s a signal that they are nearing their finish date. The next few weeks might seem to go against what I said earlier, that healthy tops equal large bulbs. However, the energy from the stalks at this stage is sent underground. All that amazing, green energy is put into forming large, healthy garlic bulbs.

In June or July, depending on the variety, it will be time to harvest. And again, the tops will communicate to you when they are ready. When the majority of the tops have turned brown and only 2-4 green leaves remain, it is time to pull them out of the ground! I usually gently pull them up with my just my hands, but it is a good idea to use a Hori Hori or trowel to ease them out. Once harvested, it is a great idea to just lay the bulbs with the tops and roots still attached on the area they were harvested from. Leave them in this position for a few days. If, however, rain is in your forecast during this period, give them shelter. This is the beginning of the curing process.

After a few days exposed to the hot sun, it’s time to put your garlic in a more permanent spot for the next few weeks of their curing process. I usually hang about 10-15 bulbs (again, leaving the roots and tops attached) in a bunch under my carport area. This provides them with good air circulation as they continue drying out. I leave them hanging for about 2-3 weeks, after which I finally cut the tops off and most of the roots. It is good to note, however, that keeping the roots on will allow the bulbs to keep a little longer. I also make sure I am separating the hardneck varieties from the softnecks, so it is easier for me in the kitchen to determine which ones to process first.

Processing
And as promised, let’s discuss processing! There are a few tried and true recipes I make every year. Garlic salt is by far the easiest and the most popular amongst my family and friends.
Garlic Salt
Put 2 cups kosher sea salt and two peeled bulbs of hardneck garlic into a food processor. Process for about 30 seconds, then spread out the mixture onto a cookie sheet. Bake the salt and garlic mixture at 200°F for about 2 hours. After the 2 hours is up, take them out, let cool, then process them in the food processor again for about 30 seconds. And there you go, garlic salt for months!
My other favorite is garlic puree. A little more involved, but still easy.
Garlic Puree

Break apart 12 garlic bulbs, leaving the paper on the cloves (I usually use hardneck varieties again, but either will do). Then put the cloves in a pot and fill with just enough water to cover the cloves. Simmer with a lid on for about 35 minutes. When soft, drain the cloves. Then comes the slightly more time-consuming task – push the garlic through a fine mesh sieve, food mill, or strainer. This will remove the papers from the garlic. When finished, put the garlic puree in a storage container and mix with 1 tablespoon olive oil. Then top the puree with another ½ tablespoon olive oil and store in the fridge. This will keep for about two months and can be used in all dishes garlic is normally used in. I especially love this puree when I’m too tired to peel and chop up fresh garlic.
My other methods for processing garlic are pesto, of course, and roasting! Roasting garlic is very easy – simply cut the tops off the bulb, so the tops of the cloves are just showing. Dribble each bulb with olive oil, wrap in tin foil, and spread out on a cookie sheet. Then bake at 450°F for 40 minutes. When finished, let the bulbs cool entirely. You can either use them right there or put a few in a freezer friendly Ziploc bag and store in the freezer! Every time you want roasted garlic for bread or pizza, take a bulb out of the freezer, microwave for 30 seconds and squeeze out that liquid gold!

There are so many ways to process and use garlic, but these are ones I rely every single year. I hope this article encourages and excites you to try planting garlic in your yard this year! It truly is a magical experience.
Author: Dana McHenry

